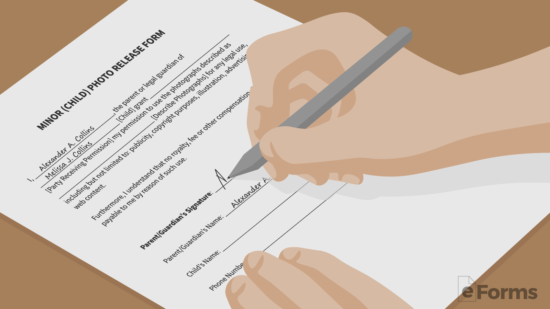
Updated January 23, 2023
A Minor (Child) Photo Release Form is a written authorization that grants permission to take photos of a child and use for private or public purpose. The parent or legal guardian of the child will be required to authorize as well as the releasee. If the release is to be used for commercial, such as a child model, payment details or royalties should be entered into this document and not a separate form.
Table of Contents |
What to Include
The release form is a formal document that should include:
-
- The name of the child who will be photographed
- The name and relationship of the person giving the authorization (parent or legal guardian)
- The setting where photos will be taken
- The parent or guardian’s signature, and the date of authorization
Release forms do not usually have expiration dates, but remember that permission can be revoked anytime.
How to Use a Minor Photo Release
Most parents that release a child’s photo rights want to ensure that the images will be used in the correct manner. A photo release gives permission for the child’s photos, whether it be for a school or commercial use, along with options for payments or royalties for the release.
Step 1 – Write Photo Shoot Requirements
Though the release form is usually a general document that does not constrain permission to one date or setting, it is wise to speak to parents about photography plans. Will photos be taken periodically during the school day or at a summer camp, or is this release really just intended for a one-time event? Try to be specific.
Step 2 – Disclose Types of Media Publications
Explain how photos will be used. Again, though releases are often general in their permissions, you should aim to be specific with parents about plans.
While it might be fine to use photos for promotional purposes, don’t forget to reward children and their families for their authorization. Share the best photos with families – perhaps by creating a newsletter, community bulletin, or other “feel-good” releases.
Step 3 – Require Identification
Make sure to verify identities before taking signatures; only a child’s parent or legal guardian is authorized to sign a release form on their behalf.
Step 4 – Have the Parties Sign the Release
Once the form has been signed, make sure to file it away in a safe place. Though you are unlikely to have to produce it in the future, you should always be prepared.
Video
How to Write
Download in Adobe PDF, Microsoft Word (.docx) or Open Document Text (.odt).
1 – Download The Consent Template Previewed In The Image
The image on this page will give you an opportunity to quickly verify if this is the release you require. Use the buttons below this preview to download this form to an easily accessible folder. You may use the file as needed and at your discretion. This form will allow the consent of one parent or guardian to be given. However, if you download this file in a format you can edit with the software on your machine, you may edit it to allow enough room for both parents or guardians to be included on one consent form.
2 – Supplement The Language To Grant Permission With Current Information
The language used in this declaration will provide the recipient with the parental or guardian consent to allow a photograph of a minor to be taken. We will need to name the parent(s) or guardian(s) on the first blank space in the first statement. This must be the adult who has the authority to grant such consent over a minor in his or her care. The second space in this statement requires the full name of each child the parent/guardian is delivering consent to photograph. If there is not enough room, then you may use your editing software to add the required space. If working manually, you may wish to print a form for each child.
The third space, just before the bracket label “Party Receiving Permission,” requires you supply the exact name of the entity receiving permission to photograph the child. Make sure this is the legal name of the photographer or studio.
Finally, use the fourth blank space to give a description of the type of photos being allowed (i.e. passport, acting headshot, family portrait, yearbook). If you need more room, you may continue on an attachment or add enough space to accommodate a full description.
3 – Execute This Document Using Your Signature
This consent will require a signature from the issuing party to prove his or her intent. Each parent giving consent must sign his or her name on the line labeled “Parent/Guardian’s Signature.” In additions to supplying a signature of consent, the parent or guardian must also print his or her name on the blank line “Parent/Guardian’s Name.”
Once, the consenting parent or guardian has provided these items, he or she must record the current date on the empty space labeled “Date.”
Next, print the full name of the concerned child on the space labeled “Child’s Name.”
Finally, produce a current and well-maintained telephone number where the signature parent/guardian can be reached in an immediate fashion on the blank line labeled “Phone Number.”